I run mail servers for many years now, but I was never brave enough to set up one from scratch for my daily mail. So I always fell back to pre-configured solutions like docker-mailserver, Mailcow, or in case of FreeBSD to iRedMail. My biggest pain point was the secure configuration of Postfix. When I discovered OpenSMTPd, I decided that it’s the right time now to finally build a fully-featured mail server setup from scratch including virtual users, spam filter etc.
I came across many useful guides but none of them was working with a recent FreeBSD version and many of them were hard to follow and it was kind of hard to tear apart the individual components and to understand how they interact.
This is why I will approach this guide a bit differently: Each post will cover one topic, but at the end of each post you will have with a working unit, that could be deployed for real-world use (in theory) even if it’s missing some features.
In this first post, we will start from a plain FreeBSD 13.0-RELEASE server and set up a jail for the mail server, as I like to isolate applications to be able to migrate and upgrade them independently. Afterwards, we will fetch TLS certificates from Let’s Encrypt and set up OpenSMTPd as a MTA, that is using local users for authentication and delivers mail to the local Maildir.
That should end you up with a server that can send and receive email, but you cannot fetch it via IMAP and it probably gets lots of spam.
In the follow-up posts we will set up Dovecot as an IMAP server with mail delivery to virtual users, switch to a common user authentication source for both Dovecot and OpenSMTPd, change the mail delivery method to LMTP and set up rspamd for spam filtering. On the way, we will talk about the DNS setup, SPF, DKIM, DMARC etc.
Experience
This guide is clearly tailored towards people experienced with FreeBSD, networking, DNS and email. If you don’t know the difference between an MTA or MDA, this is probably not for you. I don’t want to sound harsh, but I would argue that running a mail server requires a good amount of in-depth knowledge about the different mechanisms because of the overall complexity and general clusterfuck that is called “email”. If you’re inexperienced and want to learn: Great! I will include really rough explanations for terms I write about, but please make sure to read up on them in detail.
Requirements
We’ll start off with a freshly installed FreeBSD 13.0-RELEASE (although it will probably work with newer versions as well). Make sure that the you don’t host at home (because of IP reputation) and that you use an IP address that is not blacklisted.
DNS setup
There are some things to set up DNS-wise. First off, make sure that your reverse DNS record is set to the name of your future mail server: If your mail domain is example.com, your mail server domain will probably be something like mail.example.com, at least this is what I’m using in this guide. Then, set up according DNS records that point to your server:
mail          IN A          xxx.xxx.xxx.xxx
@             IN MX 10      mail
That way you only need to define your mail servers IP once in your DNS record and the MX record for your whole domain points to mail.example.com.
You also might wanna set up a SPF record (“Sender Policy Framework”). When you send an email, the receiving MTA queries the DNS TXT records for your mail domain. A special TXT record provides your SPF policy, which defines the mail servers that are allowed to send emails for the given domain. Mine looks like that:
@ IN TXT v=spf1 mx -all
That means that all mail servers mentioned in my zone’s MX records are allowed to send email for that domain.
With that out of the way, let’s prepare the host system.
Prepare host system & jail
My host system looks like that: I have one public facing IP address but internally I want to split up my services to different jails, so that I can maintain them more easily. For that to work, we set up jails using ezjail and create an internal network for the jails. On the host system, we create firewall rules in pf to set up a NAT between our internal network and the public facing IP address. This is pretty much the way your network at home works most probably: You have one public facing IPv4 address but your internal network might be full of hosts and your router creates the NAT.
For inbound connections, we forward the requests based on the port to our jails in the internal network.
I already wrote an article about that some time ago that you can follow for setting up ezjail and the NAT, so I will not describe that again, just have a look here: FreeBSD jails with a single public IP address.
Once the host system is set up, create a jail for the mail server, like:
ezjail-admin create mail.example.com 192.168.0.2
ezjail-admin start mail.example.com
Use the FQDN for your mail server as the jail hostname.
Now we need to adjust the /etc/pf.conf on the host system to forward mail traffic (and HTTP for the Let’s Encrypt HTTP challenge). Mine looks like that, make sure to replace IP and the outbound network device (which is vtnet0 in my case):
IP_PUB="xxx.xxx.xxx.xxx"

scrub in all

# Allow outbound connections from the jails
nat on vtnet0 from lo1:network to any -> (vtnet0)

rdr on vtnet0 proto tcp from any to $IP_PUB port {imap, imaps, smtp, submission, http} -> 192.168.0.2
Restart pf and you should have proper network connectivity from within the jail:
service pf restart
You should also make sure to disable sendmail both on the host system and in the jail, otherwise it binds to ports that we need for our mail setup.
To do that, add those records to /etc/rc.conf:
sendmail_enable="NO"
sendmail_submit_enable="NO"
sendmail_msp_queue_enable="NO"
sendmail_outbound_enable="NO"
Probably you have to kill the sendmail process now, or reboot.
Everything from this point on will be done inside the mailserver jail.
Create user
For this guide, we will use local system users for SMTP authentication and mail delivery. Later on, we will switch to virtual users that map to a single system user, but for the start, let’s keep it simple:
adduser myuser
Create a user, give it a password and use nologin as a shell, since the user is not really supposed to log in. The home directory will contain the Maildir, which receives all the email for now.
Fetch certificates
Before we start installing the STMP server, we need to get a valid TLS certificate. Let’s Encrypts certbot can help us with that:
pkg install py311-certbot
We will start certbot to fetch a single certificate for now. It will use the HTTP-01 challenge, therefore we need to make sure that port 80 on the host system’s IP forwards to our mail server jail. If you followed the guide so far, you already have set that up in your host’s /etc/pf.conf.
Now create the certificates:
certbot certonly --standalone -d mail.example.com
This will get us certs + key in /usr/local/etc/letsencrypt/live/mail.example.com/. We need to apply proper permissions, otherwise OpenSMTPd will refuse to start:
chmod 700 /usr/local/etc/letsencrypt/live/mail.example.com/
Install OpenSMTPd
Now we can install OpenSMTPd:
pkg install opensmtpd
We need to edit /usr/local/etc/mail/smtpd.conf. The config is really straight forward and probably easy to understand but I will comment every single line so that you can follow:
# Define two tables stored in plain text files. Those files will house our domains and mail aliases
table aliases file:/etc/mail/aliases
table domains file:/etc/mail/domains

# Set up the certificates
pki mail.example.com key "/usr/local/etc/letsencrypt/live/mail.example.com/privkey.pem"
pki mail.example.com cert "/usr/local/etc/letsencrypt/live/mail.example.com/fullchain.pem"

# Listen directives: Sockets and their configuration. lo1 is the cloned interface for our jail,
# if this would be standalone, you would need to use the public network interface
#
# We listen for incoming mail. We will make sure that you cannot send outgoing mail without
# authentication in a second
listen on lo1 tls pki mail.example.com auth-optional

# We listen on smtps (= port 465) for outgoing mail, only for authenticated users
listen on lo1 smtps pki mail.example.com auth

# We listen on submission (= port 587)
listen on lo1 port submission tls-require pki mail.example.com auth

# Actions: They don't do anything on their own but are just defined and supposed to be used
# by the matchers below. The names "local" and "relay" are made up
#
# Incoming mail that should be delivered locally is delivered to Maildir and resolves aliases to actual users
action "local" maildir alias <aliases>

# Outgoing mail is relayed to the target MTA, our mail server sends helo as "mail.example.com"
action "relay" relay helo mail.example.com

# Matchers: Checks conditions and executes the actions defined above
#
# Local email (from system user to system user) is delivered using the "local"
# action - probably not _neccessarily_ needed, only to keep local mail submission working
match from local for local action "local"

# (Incoming) mail for our registered domains is also handled by the "local" action (see above)
match from any for domain <domains> action "local"

# Outgoing mail from authenticated users is forwarded using the "relay"
# action (now it's secure but even if you would not defined that, OpenSMTPd would default to secure behavior)
match from any auth for any action "relay"
That’s it. When I saw the configuration for the first time it was such a relief that this is actually a reasonable and maintainable configuration for an SMTP server.
Now, the system already provides /etc/mail/aliases by default and we will leave it like that for now, but we need to create a file that defines the domains that we want to receive mail for (see config - it’s easy ;-)). So edit /etc/mail/domains:
example.com
If we would have more domains to receive email for, we could add them here.
Now we can start OpenSMTPd and should have a working mail server to receive and send email:
sysrc smtpd_enable=YES
service smtpd start
Check the logs in /var/log/maillog to see, what’s going on:
root@mail:~ # cat /var/log/maillog
Dec 13 16:24:47 mail newsyslog[11295]: logfile first created
Dec 13 16:24:47 mail sm-mta[11375]: gethostbyaddr(192.168.0.2) failed: 1
Dec 13 16:24:47 mail sm-mta[11376]: starting daemon (8.16.1): SMTP+queueing@00:30:00
Dec 13 16:24:47 mail sm-mta[11376]: STARTTLS=server: file /etc/mail/certs/dh.param unsafe: No such file or directory
Dec 13 16:24:47 mail sm-msp-queue[11379]: starting daemon (8.16.1): queueing@00:30:00
Dec 13 16:32:39 mail smtpd[11809]: info: OpenSMTPD 6.8.0p2 starting
If you get an error like that:
Dec 18 17:17:25 mail sm-mta[1049]: daemon Daemon0: problem creating SMTP socket
Dec 18 17:17:30 mail sm-mta[1049]: NOQUEUE: SYSERR(root): opendaemonsocket: daemon Daemon0: cannot bind: Address already in use
you can use sockstat -4 -l on the host system to check which application occupies the port. For me it looks like that:
root@mailtest:~ # sockstat -4 -l
USER     COMMAND    PID   FD PROTO  LOCAL ADDRESS         FOREIGN ADDRESS
257      smtpd      1181  10 tcp4   192.168.0.2:25        *:*
257      smtpd      1181  11 tcp4   192.168.0.2:465       *:*
257      smtpd      1181  12 tcp4   192.168.0.2:587       *:*
root     syslogd    1001  5  udp4   192.168.0.2:514       *:*
root     sshd       882   5  tcp4   *:22                  *:*
root     sendmail   861   5  tcp4   127.0.0.1:25          *:*
Run mail server tests
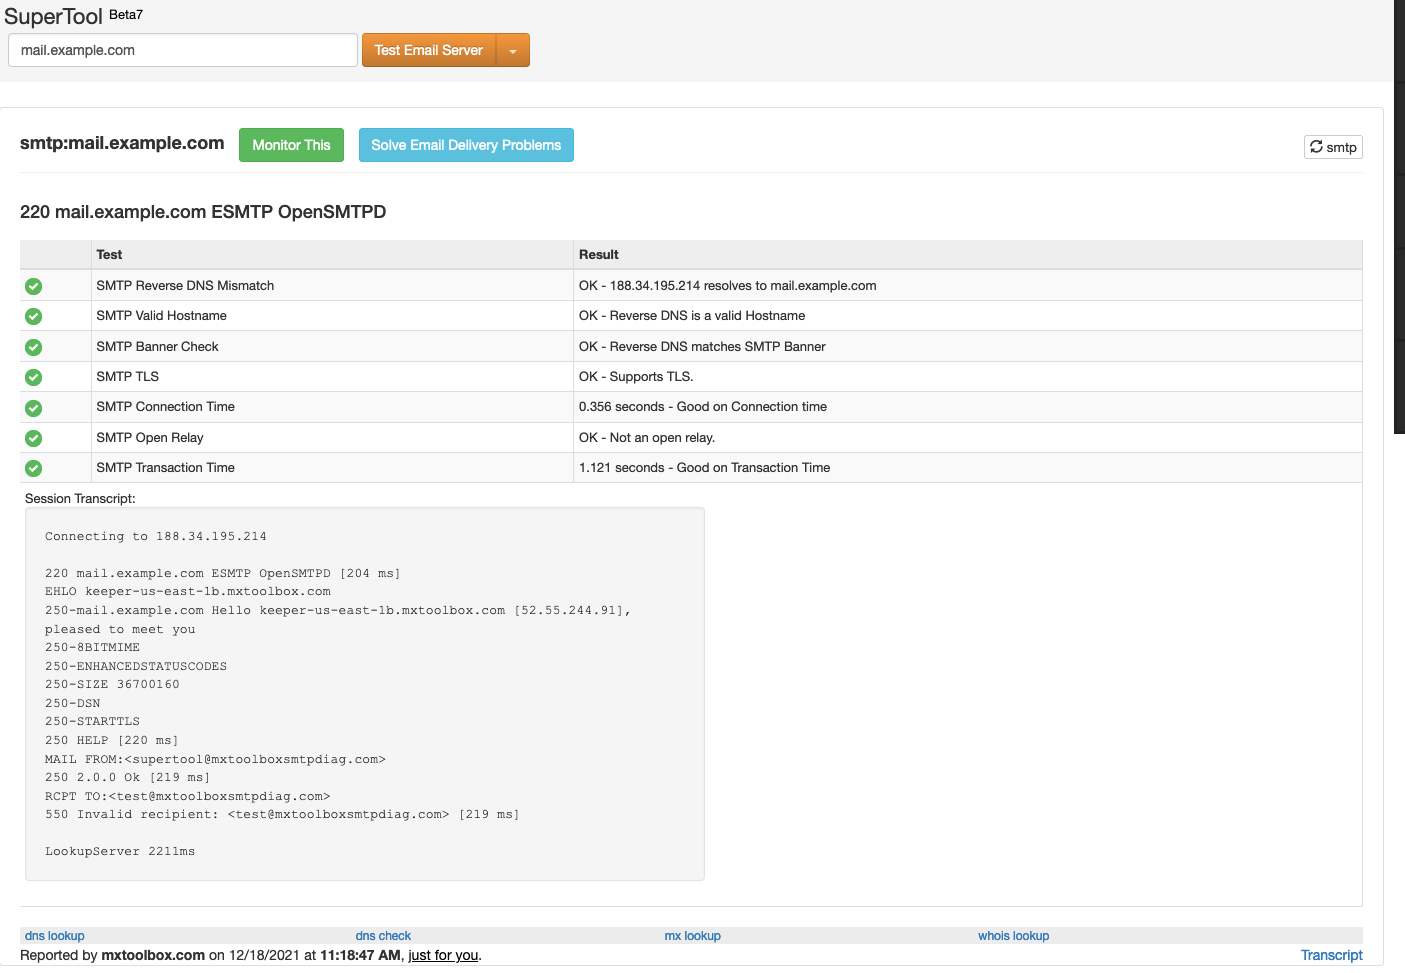
Now we can run the great mailserver test from mxtoolbox.com to make sure we have a properly configured mail server with no gaping security holes:
https://mxtoolbox.com/diagnostic.aspx
Provide your mail server’s hostname and start the test. Your maillog will show something like that:
Dec 18 17:18:47 mail smtpd[1043]: 228b979a6f27ff69 smtp connected address=52.55.244.91 host=keeper-us-east-1b.mxtoolbox.com
Dec 18 17:18:47 mail smtpd[1043]: 228b979a6f27ff69 smtp failed-command command="RCPT TO:<test@mxtoolboxsmtpdiag.com>" result="550 Invalid recipient: <test@mxtoolboxsmtpdiag.com>"
Dec 18 17:18:48 mail smtpd[1043]: 228b979a6f27ff69 smtp disconnected reason=quit
…and mxtoolbox should report something like that:
Send test mail
The last step would be to test if we can actually send email to a real email address and get a response. We will do that using openssl s_client. First off, we need to install base64 and openssl using pkg install base64 openssl.
Then, we need to create a base64 encoded string containing our username and password. For authentication we use system users at the moment, so you need to provide the username and password of the user that you created before:
printf '\0user\0pass' | base64
Make sure to replace user and pass, but leave the \0s in place. That will give you a string like AHVzZXIAcGFzcw==. Now we can try to send a email. This is an interactive proccess, so once the command is executed, it will be a question-answer thing, just provide the commands listed here one after another, where a newline means ENTER, so that the command is sent:
openssl s_client -host mail.example.com -port 587 -starttls smtp

EHLO foo
AUTH PLAIN (-> this will give you a 334, means: provide your auth)
AHVzZXIAcGFzcw== (-> paste your encoded login here)
MAIL FROM: <myuser@example.com> (<> are needed!)
rcpt to: <a-real-mail-address-you-have@gmail.com> (lowercase rcpt to...)
DATA
from: myuser@example.com
to: a-real-mail-address-you-have@gmail.com
subject: test 123
(leave a blank line, otherwise it will not work)
here goes some text, lets see if it works
. (-> the dot means: we're done)
You will see 250 2.0.0 cce6fb89 Message accepted for delivery and the email should’ve been sent. Check your mail server logs and you should see something like that:
Dec 18 17:34:54 mail smtpd[1181]: fe127b399d4ab78a smtp connected address=188.34.195.214 host=mail.example.com
Dec 18 17:34:54 mail smtpd[1181]: fe127b399d4ab78a smtp tls ciphers=TLSv1.3:TLS_AES_256_GCM_SHA384:256
Dec 18 17:35:06 mail smtpd[1181]: fe127b399d4ab78a smtp authentication user=myuser result=ok
Dec 18 17:35:47 mail smtpd[1181]: fe127b399d4ab78a smtp message msgid=cce6fb89 size=354 nrcpt=1 proto=ESMTP
Dec 18 17:35:47 mail smtpd[1181]: fe127b399d4ab78a smtp envelope evpid=cce6fb89ce1d1b30 from=<myuser@example.com> to=<a-real-mail-address-you-have@gmail.com>
Dec 18 17:35:47 mail smtpd[1181]: fe127b3cdff87bab mta connecting address=smtp://17.56.9.19:25 host=mx02.mail.icloud.com
Dec 18 17:35:48 mail smtpd[1181]: fe127b3cdff87bab mta connected
Dec 18 17:35:49 mail smtpd[1181]: fe127b3cdff87bab mta tls ciphers=TLSv1.3:TLS_AES_256_GCM_SHA384:256
Dec 18 17:35:49 mail smtpd[1181]: fe127b3cdff87bab mta server-cert-check result="success"
Dec 18 17:35:49 mail smtpd[1181]: fe127b3d8d078103 mta connecting address=smtp://17.57.152.14:25 host=mx02.mail.icloud.com
Dec 18 17:35:50 mail smtpd[1181]: fe127b3d8d078103 mta connected
Dec 18 17:35:51 mail smtpd[1181]: fe127b3d8d078103 mta tls ciphers=TLSv1.3:TLS_AES_256_GCM_SHA384:256
Dec 18 17:35:51 mail smtpd[1181]: fe127b3d8d078103 mta server-cert-check result="success"
Dec 18 17:35:51 mail smtpd[1181]: fe127b3d8d078103 mta disconnected reason=quit messages=0
Dec 18 17:35:52 mail smtpd[1181]: fe127b399d4ab78a smtp disconnected reason=disconnect
Dec 18 17:35:53 mail smtpd[1181]: fe127b3cdff87bab mta delivery evpid=cce6fb89ce1d1b30 from=<myuser@example.com> to=<a-real-mail-address-you-have@gmail.com> rcpt=<-> source="192.168.0.2" relay="17.56.9.19 (mx02.mail.icloud.com)" delay=34s result="Ok" stat="250 2.0.0 Ok: queued as 382AC34438D"
Dec 18 17:36:04 mail smtpd[1181]: fe127b3cdff87bab mta disconnected reason=quit messages=1
(yeah yeah, mine was an icloud address :-))
Means: Our mail can be delivered. Replying to the email from your freemail account should also make the response appear in your logs if the sender’s mail server is not too strict because of the missing DKIM etc… No worries, in one of the next guides we will set that up as well.
Feel free to also try to send an email with invalid credentials to make sure that that’s also covered. I hope you agree that it was not too complicated and is totally doable. Now you have a basic mail server and in the next steps we will build it up to a fully-featured mail server.