UPDATE Apr, 17 2018: Update imapsync to run as standalone docker container to make deployment easier.
In this article I will show you how to set up a fully-featured mail server including webmail as a Docker container. This article is part of the byeCloud series in which I try to replace iCloud with self-hosted services.
Let’s be honest: Setting up a mailserver really is a pain in the ass. Always. There are so many components involved, on a pretty standard setup starting from Dovecot and Postfix to Amavis, OpenDKIM, ClamAV, postgrey and much more. Getting all those components working together and, even more important, create a secure configuration for a mailserver is a work that often takes days to weeks until you have a final setup. And if you have gotten everything running, it’s a mess to update because you are in dependency hell, versions will conflict and stop working while in production.
If you do this professionally, you will have additional staging systems where you can trial-migrate to a new version but for a personal setup this does not make sense.
System setup
Luckily there are already pre-configured and relatively secure mailserver solutions like iRedMail, mail-in-a-box and mailcow or, even easier, Docker containers that include a fully-featured mail setup. In this case we will use tomav/docker-mailserver, which is one of the bigger Docker mailserver projects.
This makes deploying a mailserver relatively easy, still you have to know some things to make it work properly. This is what I want to explain here.
Before running this in production, make sure that the DNS for your domain, like mail.fancydomain.tld is set up properly and pointing to your server using a A and a MX record.
mail                     IN A       <<some ip>>
@                        IN MX 10   mail
By the way. If you want to test it out at your local machine first, just create a entry in /etc/hosts for your mail domain :-)
As always, I have prepared a docker-compose.yml file that, in this case, includes a fully-featured mailserver and Rainloop, a pretty modern webmailer that somehow reminds me of Google Mail. As always, I’m using Caddy as my reverse proxy of choice. And in this case this is even better: As Caddy obtains and updates SSL certificates for mail.fancydomain.tld anyway from Let’s Encrypt to host the webmailer, we also already have fully valid certificates for Dovecot and Postfix.
version: "3"

services:
  rainloop:
    image: hardware/rainloop
    links:
      - mail
    volumes:
      - ./data/rainloop:/rainloop/data

  mail:
    image: tvial/docker-mailserver:latest
    restart: always
    hostname: mail
    domainname: fancydomain.tld
    container_name: mail
    ports:
      - "25:25"
      - "143:143"
      - "587:587"
      - "993:993"
      - "4190:4190"
    volumes:
      - ./data/mail/data:/var/mail
      - ./data/mail/state:/var/mail-state
      - ./mail/config:/tmp/docker-mailserver/
      - ./data/entry/acme/acme-v01.api.letsencrypt.org/sites/mail.fancydomain.tld:/tmp/ssl:ro
    environment:
      - ENABLE_SPAMASSASSIN=1
      - ENABLE_CLAMAV=1
      - ENABLE_FAIL2BAN=1
      - ENABLE_POSTGREY=1
      - ONE_DIR=1
      - DMS_DEBUG=0
      - ENABLE_MANAGESIEVE=1
      - SSL_TYPE=manual
      - SSL_CERT_PATH=/tmp/ssl/mail.fancydomain.tld.crt
      - SSL_KEY_PATH=/tmp/ssl/mail.fancydomain.tld.key
    cap_add:
      - NET_ADMIN

  entry:
    image: abiosoft/caddy:0.10.4
    restart: always
    privileged: true
    links:
      - rainloop
    ports:
      - "80:80"
      - "443:443"
    volumes:
      - ./entry/Caddyfile:/etc/Caddyfile
      - ./data/entry:/root/.caddy
This is an example Caddyfile
mail.fancydomain.tld {
    proxy / rainloop:8888 {
        transparent
    }
}
Starting this using docker-compose up -d might crash the mail server first while Caddy obtains the certificates and Postfix tries to use them already. Just restart the containers again and it will work. Please note that obtaining certificates requires your system to be publicly accessible so this will likely not work if you try this at home, and not on a publicly accessible server. If you’re running this at home for example on your local machine for testing purposes you can just remove all the SSL_* environment variables from docker-compose.yml and put http:// before the domain in Caddyfile. This will generate self signed certificates upon container startup which should be okay for testing and start Caddy and plain HTTP mode.
Used ports
Just for clarification:
| Port | Description |
|---|---|
| 25 | SMTP Plain & STARTTLS |
| 143 | IMAP Plain & STARTTLS |
| 587 | SMTP over SSL |
| 993 | IMAP over SSL (prefer STARTTLS but iOS needs it for example) |
| 4190 | Sieve filter admin (optional) |
Create user accounts
As you can see in the docker-compose.yml file above, I mounted ./mail/config from the host to /tmp/docker-mailserver/ in the container. This is where the configs for Postfix reside. The Docker image does not use any database for saving user accounts. It just saves them to a config file inside this directory. But you don’t even have to edit it manually. Part of the tomav/docker-mailserver project is a script called setup.sh that allows you to perform various maintainance tasks like managing user accounts. Just download the setup.sh script into the ./mail/ folder using
curl -o setup.sh https://raw.githubusercontent.com/tomav/docker-mailserver/master/setup.sh; chmod a+x ./setup.sh
Enter that directory and call it to create specific user accounts. It will edit the files inside the configs/ folder accordingly. This is especially useful if your mailserver setup is under version control like mine is. You can commit the whole configs folder and always be sure to have your user accounts anywhere you spin up your project.
Now you can create a user using
./setup.sh email add webmaster@fancydomain.tld fancypassword
Restart the mail container and you’re set! For more information, please refer to:
https://github.com/tomav/docker-mailserver/wiki/Setup-docker-mailserver-using-the-script-setup.sh
Set up DKIM and SPF
Two must-haves for a mail server setup are DKIM and SPF records. Without those records, other mailservers will reject your mails more likely. SPF is called “Sender Policy Framework”. The domain owner specifies in the DNS record, which machines are allowed to send emails for the given domain. DKIM (“DomainKeys Identified Mail”) is a way to prove the identity of the mail sender by providing a signature in the DNS record.
Sounds complicated but don’t worry, tomav/docker-mailserver provides everything you need. We will use the setup.sh script we downloaded in the last chapter. Running
./setup.sh config dkim
will generate a the DKIM configuration for your mailserver as part of the configs/ folder. After running that command you will have a file called config/opendkim/keys/fancydomain.tld/mail.txt which contains the whole record for your DNS. SPF does not need any signature but only the IP of your mailserver. This is how DNS and DKIM are configured on my DNS:
@                        IN TXT     "v=spf1 ip4:<<your ip>> -all"
mail._domainkey          IN TXT     "v=DKIM1; k=rsa; " "p=<<here goes the key>>"
For more information, have a look at https://github.com/tomav/docker-mailserver/wiki/Configure-DKIM.
Webmail setup
Additionally, we want to set up a webmail client to access our emails. Rainloop is my absolute favorite in that regard that provides all features I need and has a pretty web interface. As seen above there’s also a service called rainloop and this is exposed using our reverse proxy so now we can just access Rainloop in the browser at https://mail.fancydomain.tld/. But first you might want to log in at https://mail.fancydomain.tld/?admin using the default credentials admin and password 12345. First off, change that credentials, then configure your default domain in the “Login” section. Then go to “Domains”, delete all existing domains and add your mail domain:
“Server” in this case is your mail container name. For further information, have a look at http://www.rainloop.net/docs/configuration/.
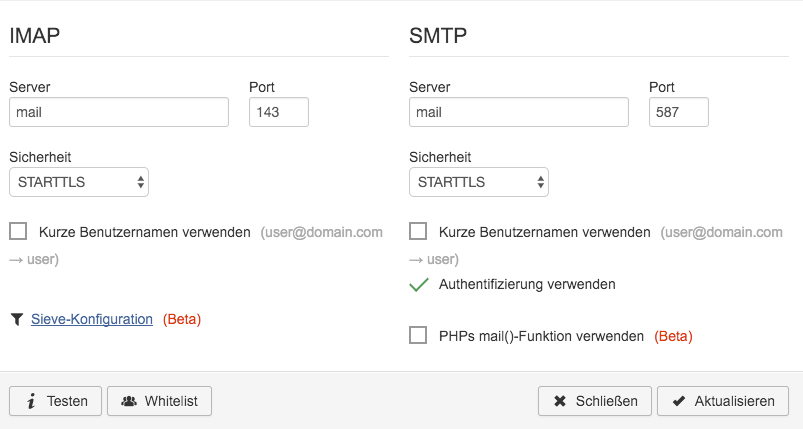
Client side: macOS (also Windows, Linux)
Any ordinary mail client with IMAP and SMTP support will do.
Client side: iOS
Be sure to map Port 993, otherwise iOS’ Mail app will not be able to connect.
Data migration
I used imapsync to synchronize my emails. It is a simple but awesome Perl script that connects to both of the IMAP servers and transfers all contents from server a to server b. If you also plan migrating from iCloud and have two-factor authentication enabled then ensure to create a app-specific password first. This can be done on the following page: https://appleid.apple.com/#!&page=signin.
Be sure to put the correct network (if you provided any, otherwise omit it), and the correct link (the left side needs to be your mailserver container name from docker ps ).
With that setup the following settings worked for me. Please make sure to have a proper backup in place before running this:
docker run -it --rm --network mail-net --link mail:mail gilleslamiral/imapsync imapsync \
    --host1 imap.mail.me.com \
    --user1 fancy-icloud-address@icloud.com \
    --password1 'foo123' \
    --ssl1 \
    --timeout1 0 \
    --host2 mail \
    --user2 new-target@my-own-address.com \
    --password2 'foo123' \
    --tls2
Also I would highly suggest that you run this from your later production system. Not only will it be much faster, also if your ISP - like mine - cannot separate SMTP traffic from IMAP traffic, he might send you a nice letter prompting you to stop spamming other people…
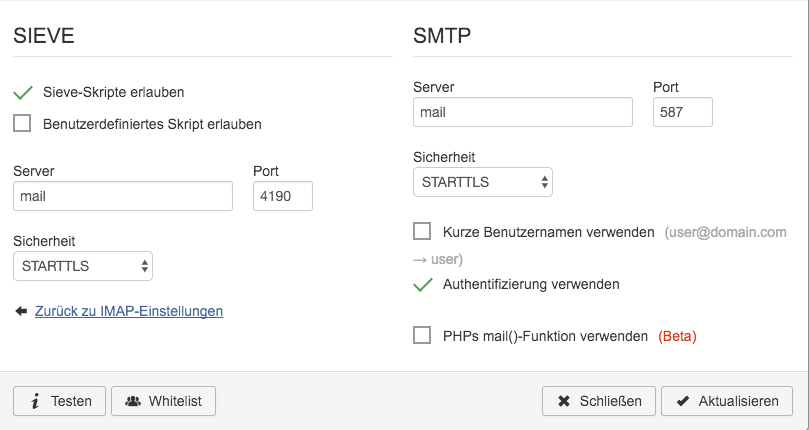
Using subaddressing
One of my favorite features in E-Mails is subaddressing. This allows, if your email is user@domain.tld to send emails to e.g. user+amazon@domain.tld. This helps tracking down spam and allows to block single addresses in case of emergency but can also be used to automatically deliver emails to the matching folder name in your inbox. While subaddressing is enabled out-of-the-box in tomav/docker-mailserver, it still puts all the mail into your INBOX, no matter to which address they are sent.
I put the following sieve-rule to ./data/mail/data/domain.tld/user/.dovecot.sieve:
require ["fileinto", "mailbox", "subaddress", "envelope", "variables"];
if envelope :matches :detail "to" "*" {
  fileinto :create "${1}";
}
For more information, have a look at https://github.com/tomav/docker-mailserver/wiki/Configure-Sieve-filters.