If you encounter any problems, please check the up-to-date documentation at https://github.com/dprandzioch/docker-ddns .
In some projects I need access to various hosts with a dynamic IP from time to time. Dyndns services offer a great solution by providing a DNS with records that are updated by the clients once their IP addresses change.
There are various existing services out there that are either free or paid, but if you want to self-host a dyndns service, you have to set up a DNS by your own as well as some endpoint that your clients can connect to in order to update their records.
To make that easier I created a little project called docker-ddns on GitHub: https://github.com/dprandzioch/docker-ddns. This project consists of a DNS configuration and a REST API written in Go. Both is packaged in a neat Docker image so that it is really easy to set up. It supports both IPv4 and IPv6.
Requirements
You will need the following to get it working:
- Docker
- make
- git
Installation
As described in the README file, just do the following:
git clone https://github.com/dprandzioch/docker-ddns
cd docker-ddns
$EDITOR envfile
make deploy
This will download the repository and open envfile in your default editor. There are three settings you will have to set:
SHARED_SECRET=changeme
ZONE=example.org
RECORD_TTL=3600
SHARED_SECRET must be provided each time you update a DNS record via the API, change it to a secure phrase you don’t use anywhere else (as it is passed via GET for compatibility with various routers). ZONE is your dyndns domain, this could be something like dyndns.domain.tld. RECORD_TTL is the time-to-live set for each DNS record, you can keep 3600 as a sane default.
make deploy builds the docker image from the sources provided and starts a Docker container on your system called dyndns that exposes ports 53 (UDP+TCP) and 8080 (TCP).
That’s it. Your server is running and the only thing to do is configure your DNS. Additionally I’d encourage you to put a reverse proxy like nginx or Caddy in front of the REST API and connect to it only via HTTPS to keep your data secure - but this is optional.
Upstream DNS configuration
Given your domain is domain.tld, log in to your domain hoster and create a subdomain with a dedicated NS record that points to your newly created DNS. The NS record itself should point to a A record that is also created, which again points to the IP address of your DNS, like this:
dyndns                   IN NS      ns
ns                       IN A       <put ipv4 of dns server here>
ns                       IN AAAA    <optional, put ipv6 of dns server here>
Creating and updating DNS records
Now your dyndns domain is called dyndns.domain.tld, and you can create subdomains like mymachine.dyndns.domain.tld.
To do this, just call the REST API, this can be done by a cronjob, from your router (if it supports that) or manually… It’s a simple GET request that could even be executed directly within your browser:
http://dyndns.mydomain.tld:8080/update?secret=changeme&domain=mymachine&addr=1.2.3.4
Updating from the router
This is how your router configuration could look like, in my case on a AVM Fritz!Box:
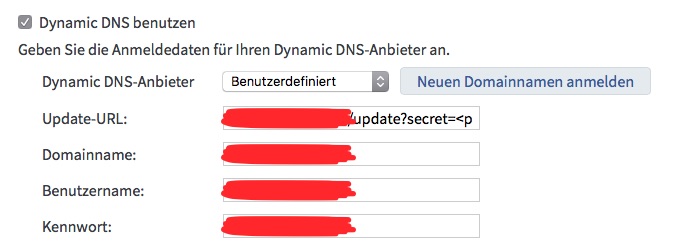
The Update URL would then be something like that:
http://dyndns.domain.tld/update?secret=<pass>&domain=<domain>&addr=<ipaddr>
That’s it! If you have any questions, suggestions, bugs etc., please feel free to report them.