In this little series I’d like to show you how to set up a blog, or in fact any website, using Hugo, a static site generator written in Go. I’ve used many static site generators from Jekyll to Octopress but in the end I got stuck with Hugo. As a evidence for how awesome Hugo is you can have a look at this very site (just kidding), which is also built using Hugo. I love it’s flexibility and it’s developer-alike approach to implementing sites.
Like most static site generators, Hugo uses Markdown files as a content format, which means you can edit your blog in any text editor with a simple syntax, add some HTML, CSS and probably even JavaScript and in the end you compile your blog with a single command that - in case of Hugo - is blazingly fast ending up with just a bunch of HTML files. The advantages are obvious: No PHP or MySQL needed (which means you can host it for free e.g. on GitHub or GitLab), no attack surface at all since everything is static, you can keep your blog and all it’s contents under version control, you don’t need a cookie warning since you don’t use cookies and so on and so on.
Installation
On macOS using Homebrew, the installation is about as easy as it can get:
brew install hugoThis installs the Hugo binary to /usr/local/bin/hugo, which is in your $PATH so you can simply execute it by running
hugo afterwards. Many GNU/Linux distributions also include Hugo in their package repositories, otherwise you can download
it here: https://github.com/gohugoio/hugo/releases.
Create a site
Next you want to create a new site. The following command will create a new folder called hugo-tutorial which is the root
folder for your site.
hugo new site hugo-tutorial
Congratulations! Your new Hugo site is created in /Users/davd/Workspace/hugo-tutorial.

Just a few more steps and you're ready to go:

1. Download a theme into the same-named folder.
   Choose a theme from https://themes.gohugo.io/, or
   create your own with the "hugo new theme <THEMENAME>" command.
2. Perhaps you want to add some content. You can add single files
   with "hugo new <SECTIONNAME>/<FILENAME>.<FORMAT>".
3. Start the built-in live server via "hugo server".

Visit https://gohugo.io/ for quickstart guide and full documentation.
The message provided after creation is pretty straight-forward and describes everything that we’ll do next. Entering the folder gives you the following structure:
tree -L 2
.
├── archetypes
│   └── default.md
├── config.toml
├── content
├── data
├── layouts
├── static
└── themes
We’ll cover each of those files and folders soon, but basically this is a very bare scaffold of a Hugo site. The most important
file is config.toml where you might want to set some properties soon.
Themes
When you would try to run hugo server now, you would get a blank page since there’s nothing Hugo could render. Alongside
you’ll get a warning in the console:
WARN 2019/02/11 19:09:08 Found no layout for "home", language "en", output format "HTML": create a template below /layouts
with one of these filenames: index.en.html.html, home.en.html.html, list.en.html.html, index.html.html, home.html.html,
list.html.html, index.en.html, home.en.html, list.en.html, index.html, home.html, list.html, _default/index.en.html.html,
_default/home.en.html.html, _default/list.en.html.html, _default/index.html.html, _default/home.html.html, _default/list.html.html,
_default/index.en.html, _default/home.en.html, _default/list.en.html, _default/index.html, _default/home.html, _default/list.html
To make this work, you need to provide a theme. Like in any other CMS, a theme is the presentation layer of your site and consists of HTML
and CSS. In Hugo, themes are “installed” by creating a folder in the themes directory that contains all the neccessary files to
get you started. You can either do this by using git clone (be aware of submodules!) or by creating a folder and copying the
files over manually. For the sake of simplicity, I assume that you know about Git submodules and therefore that you have to think a bit
about how to set up your repository layout.
It’s important to know though that the theme not only defines how your page looks, but also defines the view logic, e.g. what
content is displayed where, how the content type has to be named and so on, you make sure you read the README.md file in the
themes’ repository.
Hugo comes with a lot of themes you can choose from over at https://themes.gohugo.io/. I picked hugo-primer
since it’s simple, so let’s clone the theme into themes/primer and configure the theme in config.toml:
git clone https://github.com/qqhann/hugo-primer.git themes/primer
Cloning into 'themes/primer'...
remote: Enumerating objects: 31, done.
remote: Counting objects: 100% (31/31), done.
remote: Compressing objects: 100% (26/26), done.
remote: Total 485 (delta 9), reused 14 (delta 4), pack-reused 454
Receiving objects: 100% (485/485), 1.47 MiB | 2.65 MiB/s, done.
Resolving deltas: 100% (241/241), done.
echo 'theme = "primer"' >> config.toml
Running hugo server again will give you something like this:
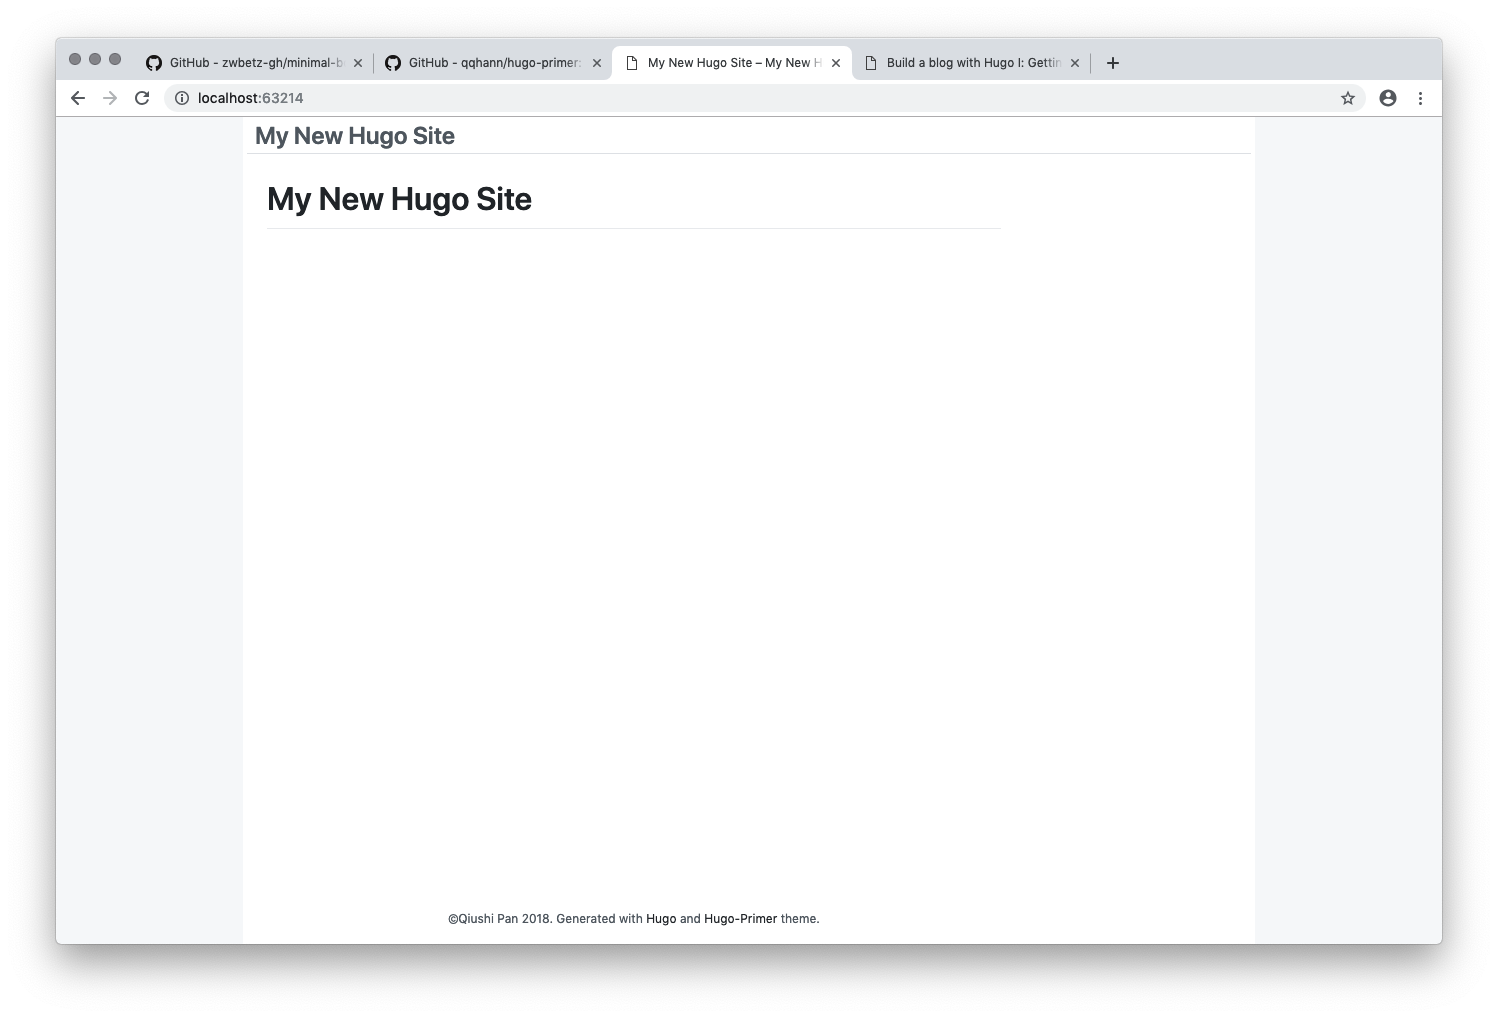
So far, so good. You have your page title which you can adjust in config.toml. Later on we’ll have a look how to extend
this theme to make a actual site out of it but for now we have a working environment.
When you look at the theme folder, we have a bunch of files that I want to show you briefly, the other ones should be self-explainatory:
themes/primer
├── LICENSE.md
├── README.md
├── archetypes
│   └── default.md
├── images
│   ├── screenshot.png
│   └── tn.png
├── layouts
│   ├── 404.html
│   ├── _default
│   │   ├── baseof.html
│   │   ├── list.html
│   │   └── single.html
│   ├── index.html
│   ├── partials
│   │   ├── card.page.html
│   │   ├── copyright.html
│   │   ├── footer.html
│   │   ├── header.html
│   │   ├── navbar.html
│   │   ├── paginator.html
│   │   ├── side.taxonomy.html
│   │   ├── taxonomy.html
│   │   └── toc.html
│   ├── taxonomy
│   │   ├── taxonomy.html.html
│   │   └── terms.html.html
│   └── top
│       └── index.html
├── static
│   └── assets
│       ├── primer-build.css
│       ├── style.css
│       └── syntax.css
└── theme.toml

9 directories, 26 files
The index.html is the template for the “home page”, so the page that you see when you enter the site. All those files define blocks,
that are then overwritten in layouts/_default/baseof.html that contains the overall HTML structure of the page, the concept is pretty simple
and you’ll figure it out when you have a look at those files. For more information, please refer to https://gohugo.io/templates/base/.
layouts/_default/list.html is the template that is used for listing posts for specific tags or categories that we will
cover later on.
Content Types & Archetypes
Now that we have our theme running, we want to create some content. Hugo has a notion of “Content Types” which define entities
that you want to represent on your site. For now, we will use only posts since we create a blog but others would be possible.
The clue is that you can define your own content types with any number of properties and render them using individual templates
which basically allows you to implement any content type, like events, photos, news, release notes or CV items. If you’re a local
shop that wants to let users know of your inventory, you could define a type
called products with all relevant properties like name, price, amount in stock, description and so on. This works by creating
a own subfolder with the name of your type within content and then providing a template that renders a list of those items and an
individual item.
Create a new item of the posts content type using:
hugo new posts/first-post.md
/Users/davd/Workspace/hugo-tutorial-new/content/posts/first-post.md created
Hugo will create a new markdown file, that looks like this:
---
title: "First Post"
date: 2019-02-11T19:41:27+01:00
draft: true
---
The first part is the YAML front matter, a metadata block that defines properties
of your post, event or whatever. You can extend this by your own needs and it will be available in your HTML templates for further processing.
Below you can write your content, like a blog post or a page. When you look at archetypes/default.md, you’ll see something similar:
---
title: "{{ replace .Name "-" " " | title }}"
date: {{ .Date }}
draft: true
---
This is what archetypes are, a template for a specific content type that is copied and interpolated when you use hugo new to create
a item of a specific content type. So you could create archetypes/products.md with additional properties and when you call hugo new products/coffee.md,
Hugo will use that file as a template to create your item.
But for now, let’s stick with posts and fill content/posts/first-post.md with some content:
---
title: "First Post"
date: 2019-02-11T19:41:27+01:00
draft: true
---

Hello World!
Running the Hugo development server with hugo server will not show you the new post since it has draft: true. Drafts are items
that will not be published when you build your site since they are not considered final. You could either set draft to false or you
can run Hugo in the draft mode: hugo server -D, and you will see your first post:
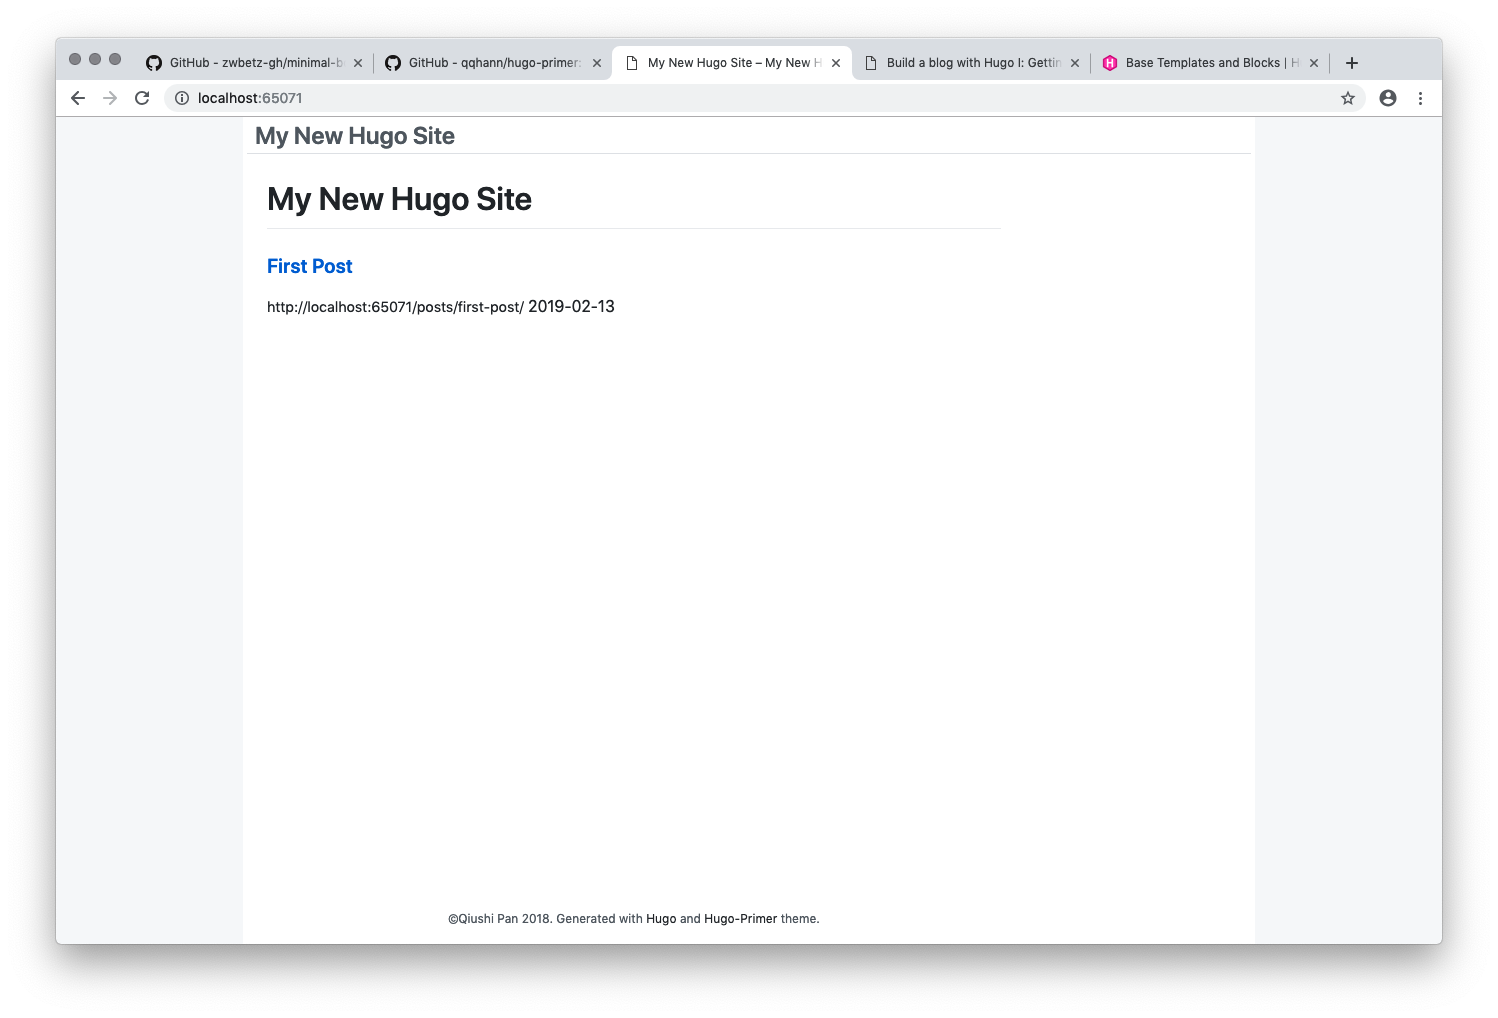
Clicking the title will get you the detail page. Feel free to modify some of the HTML template files now to explore a bit how things will change and to get a deeper understanding of how content is rendered in Hugo.
Navigation
We probably also want to add our post to the navigation (maybe this is a very special post ;-)). Let’s have a look how this is done
in the theme by looking at themes/primer/layouts/partials/header.html:
  {{ with .Site.Menus.main }}
  <div class="UnderlineNav-body">
    {{ range sort . }}
    {{ if .HasChildren }}
    <div class="flex-column position-relative dropdown" >
      {{ .Pre }}
      <span class="UnderlineNav-item {{ if $currentPage.HasMenuCurrent "main" . }}selected{{ end }}">{{ .Name }}</span>
      <div class="Box Box--condensed position-absolute dropdown-content ">
        {{ range .Children }}
        <div class="Box-body" style="">
          <a href="{{ .URL }}">
            {{ .Name }}
          </a>
        </div>
        {{ end }}
The template is using a site-wide variable .Site.Menus.main. This could either be configured in the config.toml or in the frontmatter
of the post, which I prefer. Let’s extend our post to include a navigation item:
---
title: "First Post"
date: 2019-02-11T19:41:27+01:00
draft: true
menu:
    main:
        name: "Some special post"
---

Hello World!
Look at your rendered page again, and you will see the new menu item.
Outlook
So now you got a really basic blog set up, it doesn’t look pretty but it works. Next time we will have a look how you can edit content more powerful using shortcodes, I’ll explain how taxonomies work, how you can configure Hugo, what output formats are and how to deploy your site to GitHub or GitLab.
There is much more Hugo can do and we’re only scratching the surface but you’ll figure this out once you got a need for something in particular.